
Updated: 8.22.09

.
The Northrend Beasts consists of 4 different mobs, Gormok, Acidmaw / Dreadscale, and Icehowl. The following strategy will be for 25man, however there are no differences in abilities between 10 / 25 man.
Raid Makeup:
Tanks: 2
Healers: 5-7
DPS: Assorted melee / ranged
First, I’ll go over each bosses abilities and then do a strategy breakdown at the end.

Gormok the Impaler
The first of the 4, he is a Magnataur and relatively easy once you understand his few abilities.
Health: 25man – 8,924,800
Tanks Required: 2
Healers: 3 on MT, rest on raid
Abilities:
- Staggering Stomp – Deals a staggering stomp that inflicts 7200 to 8200 Physical damage to all enemies within 15 yards and interrupts spellcasting for 8 seconds.
- Impale – Deals 100% of weapon damage to an enemy and causes the target to bleed for 2188 to 2812 damage per application every 2 seconds for 30 seconds.
- Rising Anger – Increases all damage dealt by 15%. Applied every time Gormok throws a Snobold.
- Summon Snobold – Creates an add, Snobold (will summon a total of 5 Snobolds).
- Batter – Strikes a player for 75% of weapon damage (about 1000 to 1200 damage) and interrupts spellcasting for 5 seconds.
- Fire Bomb – Inflicts 4813 to 6187 Fire damage (about 4500 to 5200 on average) to all enemies within 8 yards of the target.
- Head Crack – Cracked in the head by a Snobold, stunned for 2 seconds..
After Gormok is dead you will have a few seconds before the gate opens and in comes Dreadscale. Shortly after Dreadscale enters the room, Acidmaw will pop up out of the ground, rooted in place.
Initially, Dreadscale is on top of the ground, able to roam around the room anywhere the tank pulls him. Acidmaw is rooted in place from popping up out of the ground. Periodically they will both burrow and upon reappearing they will switch places. Acidmaw will be roaming and Dreadscale will be rooted. When either of them is killed the other will Enrage: increasing damage by 50%.
Dreadscale – the Fire Jormungar
Health: 5,020,200
Tank: 1
Healers: 2
Abilities while roaming:
- Burning Bite – Inflicts 12950 to 15050 Fire damage to an enemy and coats them with burning bile.
- Burning Bile – Deals 3238 to 3762 Fire damage to allies within 10 yards. The burning bile of a jormungar is known to neutralize paralytic toxins.
- Molten Spew – Deals 3700 to 4300 Fire damage per 0 seconds to enemies in front of the caster.
Abilities while rooted:
- Fire Spit – Deals 6475 to 7525 Fire damage to an enemy.
- Burning Spray – Sprays fluid at an enemy and nearby targets, dealing 6938 to 8062 Fire damage and coating them with burning bile.
Acidmaw – the Acid Jormungar
Health: 5,020,200
Tank: 1
Healers: 2
Abilities while roaming:
- Paralytic Bite – Inflicts 11100 to 12900 Nature damage on an enemy and injects them with paralytic toxin.
- Paralytic Toxin – Applies a paralytic toxin that inflicts increasing Nature damage every 2 seconds and reduces movement speed over time until the victim is entirely paralyzed. Exposure to Burning Bile neutralizes Paralytic Toxin.
- Acidic Spew – Deals 3700 to 4300 Nature damage per 0 seconds to enemies in front of the caster.
Abilities while rooted:
- Acidic Spit – Deals 6475 to 7525 Nature damage to an enemy.
- Paralytic Spray – Sprays acid at an enemy and nearby targets, dealing 6938 to 8062 Nature damage and applying a debilitating paralytic toxin.
Acidmaw and Dreadscale have a few abilities that are shared and dependent on whether they are rooted or roaming.
Rooted:
- Sweep – Whirls around, dealing 6938 to 8062 Physical damage to enemies within 15 yards and knocking them back.
Roaming:
- Poison Cloud – Inflicts 5088 to 5912 Nature damage to enemy targets within the Poison Cloud.
After the two worms die the gates open again for the final of the beasts. Icehowl steps in.

Health: 13,247,750
Tank: 1
Healers: 3-4 (all healers should try to keep a HOT on the MT due to weird burst)
Abilities:
- Artic Breath – An icy breath that freezes targets in a cone in front of the caster, inflicting 20000 Frost damage over 5 seconds.
- Whirl – Whirls around, dealing 8325 to 9675 Physical damage to all nearby enemies and knocking them back.
- Massive Crash – Leaps into the air and crashes down with a massive force, dealing 9250 to 10750 Physical damage to all enemies, stunning them, and knocking them back.
- Staggered Daze – Stunned by a massive impact, unable to act and taking 100% more damage for 15 seconds.
- Frothing Rage – Increases Physical damage and attack speed by 50%.
- Ferocious Butt – Delivers a ferocious headbutt to an enemy, inflicting 69375 to 80625 Physical damage and stunning for 2.5 seconds.
 Strategy:
Gormok, the Impaler
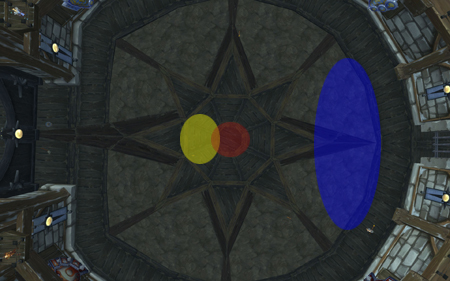
RED: Main tanks
YELLOW: Melee
BLUE: Healers / Ranged
Gormok is the first of the 4 bosses and has a few abilities, relatively easy to master. Starting off you will need 2 tanks. Periodically Gormok will Impale the main tank, when the main tank gets his 3rd stack of impale the secondary tank will taunt off him, taking over. (Note: We had the tank give a vent warning, about 3 seconds, before he taunted off so healers would be ready.)
The tank that is tanking Gormok will need 3 healers. The other tank will need 1 healer to keep him from dying to the bleed after it has been taunted off of him. (Healer Note: If you have multiple restoration druids they can keep hots on the tank that is not tanking instead of assigning him a solo healer.)
Gormok’s stomp has a 15 yard range, casters should NEVER get hit by this. Talk about seriously screwing you up, a 5 second interrupt is bad. The stomp also does about 8k damage to anyone it hits, so one of the raid healers needs to top them off.
Periodically Gormok will summon a Snobold, it is launched at someone, stunning that person when it lands usually. If the Snobold is in ranged then the ranged kill it. If it is in melee then both ranged and melee should burn it down. The Snobold does a bit of damage to the person it is on, easily healed, and also does an attack called batter (read: kick, counterspell, etc.). Snobolds also toss a fire bomb, leaving fire patches. They do quite a bit of damage, 3 ticks will kill most cloth wearers.
Gormok also has an ability called Rising Anger that increases his damage by 15% per stack. Each time he tosses a snobold (he’ll do this 5 times on 25man) he gains a stack of the buff.
After Gormok is dead you will have a few moments to finish off any Snobolds you still have up… which you shouldn’t.
Acidmaw / Dreadscale
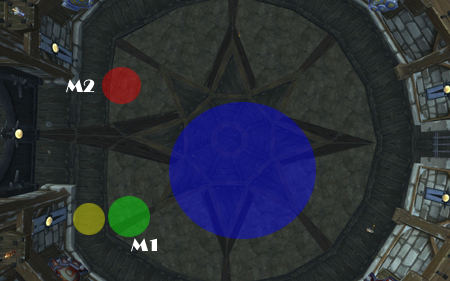
M1: Acidmaw Tank
M2: Dreadscale Tank
RED: Dreadscale (upon entering the arena)
GREEN: Acidmaw (upon entering the arena)
YELLOW: Melee
BLUE: Ranged / Healers
The gate will open and Dreadscale will come through. Each tank will need 2 healers. (Note: Tanks will likely still have bleed stacks on them so they need to be heavy healed at the beginning of this phase until it falls off. Paladins can bubble this off and Hand of Protection it off of others. Stoneform will NOT drop the bleed stacks.)
Dreadscale is the fire worm, he needs to be picked up and tanked nearish to the door. Acidmaw is the acid worm and will pop out of the ground.
Since Dreadscale is not rooted he will only be doing a burning bite, applying the burning bile to ONLY his tank. This is a bit tricky but Dreadscale’s tank needs to drag him away to drop a poison cloud and then drag him back so that he can get any poison off of Acidmaw’s tank, melee, or anyone who needs it. This is the most difficult part of the encounter, the tank that is tanking Dreadscale needs to learn to dance around not doing frontal cones on the raid but still moving to get the Paralytic Poison off of people.
Ranged should be spread out so that they don’t all get poisoned at once and anyone who gets poisoned (this includes melee) should immediately start running towards Dreadscale’s tank. All DPS should start on Acidmaw as he is the worst of the two.
After a short time they will both submerge and reset aggro. As they reappear they will have switched positions, Dreadscale rooted while Acidmaw is roaming around. Dreadscale will spit his burning bile making it much easier to cure any poisons that might appear, which should only be on Acidmaw’s tank. Its important that ranged spread out since burning bile deals damage to the people around you. A bunch of people bunched up will quickly destroy the raid. It is difficult to see the poison clouds put out by whichever worm is roaming so move him every few seconds or keep on a constant slow movement.
You should be able to kill Acidmaw while he is in his first roaming phase. If not they will submerge and its a simple rinse and repeat. (Note: If you want to shorten the Jormungar phase it is suggested you blow Heroism/Bloodlust as soon as Acidmaw appears.)
After Acidmaw dies, Dreadscale will enrage, doing 50% more damage. All healers that were on tanks should heal this tank, there is no reason for him to die due to unexpected burst damage.
Due to the enrage melee should stay off of Dreadscale if he is rooted. It is highly likely the whirl will oneshot some of them.
After both worms are dead the gates will open for the final boss, Icehowl.
Icehowl
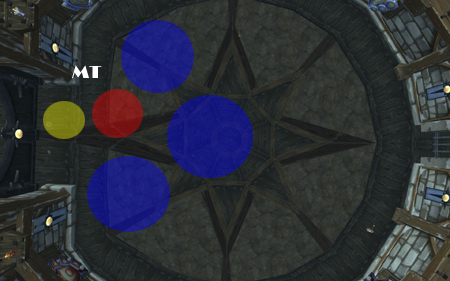
MT: Icehowl’s tank
RED: Icehowl
YELLOW: Melee
BLUE CIRCLES: Ranged / Healers spread out.
(Note: You can tank Icehowl up against any wall after his stun, raiders simply need to understand how they should be standing. Melee on the closest wall to Icehowl to prevent getting hit by Icy Breath targeted on melee and so they don’t get knocked as far back by whirl. Healers need to make sure to split up so they don’t all get breathed on.)
His melee damage is quite bursty so disc priests are awesome for MT healing this fight. I suggest 3-4 healers on MT. Positioning is also important in this fight to avoid as much damage as possible from his icy breath. Icehowl’s Icy Breath can target anyone, he will turn to them, and begin breathing it.
We opted for tanking him against the gate. The tank angles him so the melee can stand on the side closest to the gate, keeping them out of any icy breaths targeted at range. Healers should be assigned, 2 South, 2 East, 2 North (1 MT / 1 Raid in each position).
Every so often Icehowl will jump into the air and then slam back down knocking everyone back to the wall, stunning them. Icehowl will target someone, jump BACKWARDS then run across the room to slam into where they were standing. It is important that the person he is running towards and the people near that person move out of his path. You get a speed buff, there is no reason to get hit with his charge. (Note: People have to make sure not to run in front of him as he’s charging across the room as he will kill anyone who gets to close to him… enraging him. I’m not sure if it is a bug but I have noticed Icehowl’s pathing curve slightly as if he is somewhat following the person he is charging. It is VERY important that people simply keep running until he is stunned at the wall.)
(Healer Note: If Icehowl enrages then any healer in range of the tank needs to pop their cooldowns such as Guardian Spirit, Pain Suppression, etc. Tanks should also blow shield wall or its equivalent as well.)
When he slams into the wall he will be stunned for 15 seconds and take 100% extra damage. This is a great time to blow heroism. As soon as the stun wears off he will turn and hit the MT once or twice (Healer Note: Make sure the tank is healed up and has your HOTs / bubbles, I’ve seen tanks one shotted several times after the stun wears off). Then he’ll do an icy breath and you can reposition him.
Rinse & Repeat.

If you have any questions, suggestions, or would like further clarification on certain points just toss a comment down below.

Stoneform does not get rid of the bleed, and the first boss can be disarmed. I recommend using disarm the second time you tank him because at the point he will have a few stacks of rising anger and hit pretty hard.
Xeonio Edit: Thx sir, adding the information.
Nice overview.
Gormok is a mixed bag. The healing on the two tanks is fairly busy, but its only a hard fight due to the high number of disconnections, especially when he does his fire breath.
For the big worms all our ranged/healers stand about 15 yards away from fire worm while we burn the acid worm. This makes it pretty easy for people who get the paralytic poison to charge to the fireworm tank to get it removed.
Once acid worm dies we then spread out 10 yards (think KT or the new Lord Jaz) so we don’t get destroyed by his firebreath. The enraged fire worm hits like a limp leek.
On Icehowl I’d suggest any priest healer in range of the tank immediately cast Pain Supression/Guardian Spirit on the tank if they see the raid warning about Icehowl enraging. It will probably save a wipe. Hunters/rogues can Tranq shot/rogue special thingy off the enrage.
Gobble gobble.
Thanks Bob, I’ve updated a lot of the information and added some positioning pictures.